Detailed guide to use the Visual Studio 2013 IDE with FWH
Posted: Mon Jun 23, 2014 5:21 am
1. Create a new project from Visual Studio:

2. Select empty:

3. Click on "Finish button"
4. You will get a project like this one:

5. Right click on "Source files" and select "Add an existing item" and start adding your PRG files:

6. Your PRGs will be shown in the "Solution Explorer":

7. Right click on the PRG file and select these options and click on "OK":

8. Right click again on the PRG file and these time fill these options this way and click "OK":
Copy the bold text from here:
c:\harbour\bin\harbour %(FullPath) /n /ic:\harbour\include /ic:\fwh\include
.\%(Filename).c
Warning: For Visual Studio Community 2015 use:
c:\harbour\bin\harbour "%(FullPath)" /n /ic:\harbour\include /ic:\fwh\include
If you are using an existing PRG located at a certain folder then use:
c:\harbour\bin\harbour "%(FullPath)" /o%(RelativeDir)%(Filename).c /n /ic:\harbour\include /ic:\fwh\include
%(RelativeDir)\%(Filename).c

9. At this point you can right click on the PRG file on the "Solution Explorer" and select "compile".

Alternatively you can already click at the top on Run ("Local Windows Debugger" the button with the "green play" bitmap) and it will get compiled.
10. Now you have to add the C file that Harbour generated to the project. Again Right click on "Source files" and select "Add an existing item" and
choose your filename.c, in this example tutor01.c
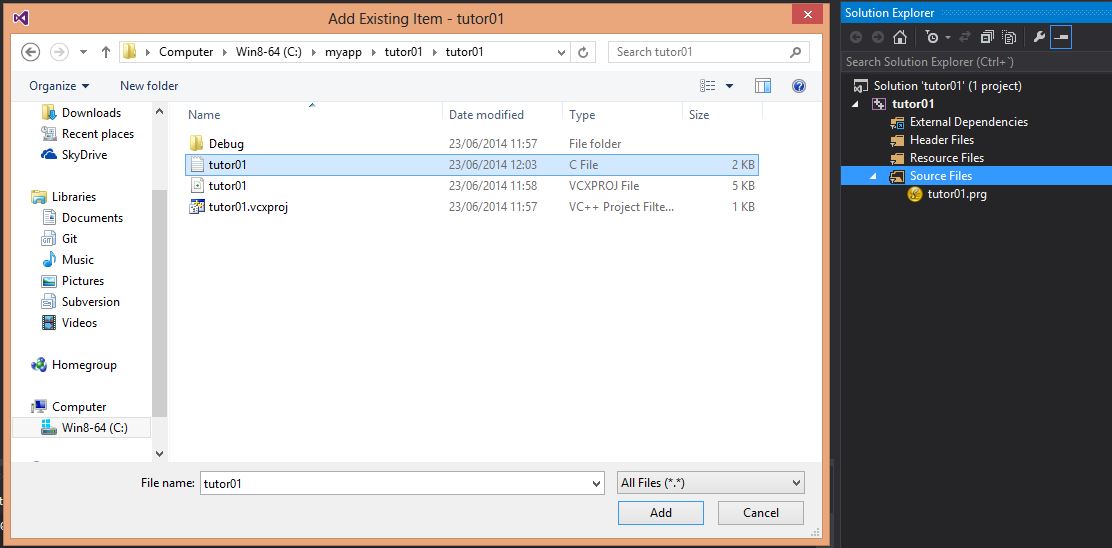
The "Solution Explorer" will look like this:

11. Right click on the C file and set this value and click on "OK":
Copy the bold text from here:
c:\harbour\include;%(AdditionalIncludeDirectories)

12. Again right click on the C file, select compile and it should properly compile it:

13. Now if you click at the top on Run ("Local Windows Debugger" the button with the "green play" bitmap), Visual Studio will try to build your app but the libraries have not been added yet, so you will get this:

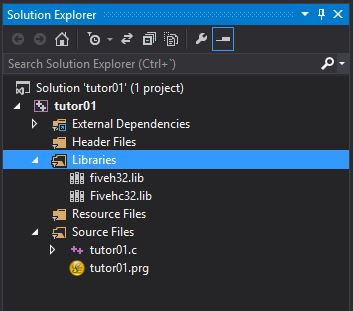
14. Now we are going to add the libraries, but to keep our project well structured, right click on the tutor01 in the "Solution Explorer", just below "Solution 'tutor01' (1 project) and add "New filter" (it creates a folder) and rename it as "Libraries". It will look like this:

15. Right click on the Libraries folder and select "Add an existing item" and select FiveH32.lib, same for FiveHC32.lib:
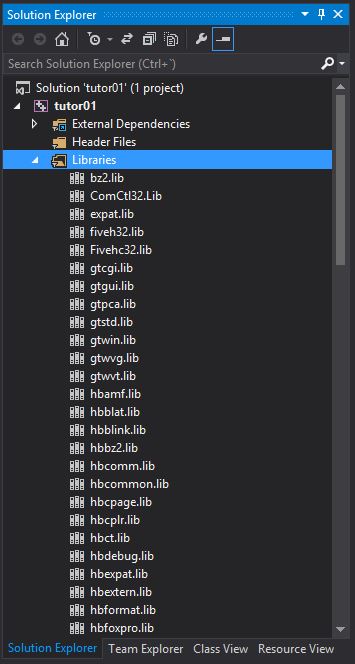
16. Now lets add the Harbour for Visual Studio 2013 libraries. You can add one by one, or simply select all of them, but VERY IMPORTANT some of them have to be removed: All that end with ..._dll.lib in their names.
You have to remove: hbnortl.lib, hbnulrdd.lib, harbour-32.lib, hbvmmt.lib, hbmaindllp.lib, hbmainstd.lib, hbmaindllp.lib. Right click on their names and delete them (you will go faster if you delete all ..._dll.lib files before adding all the libraries):
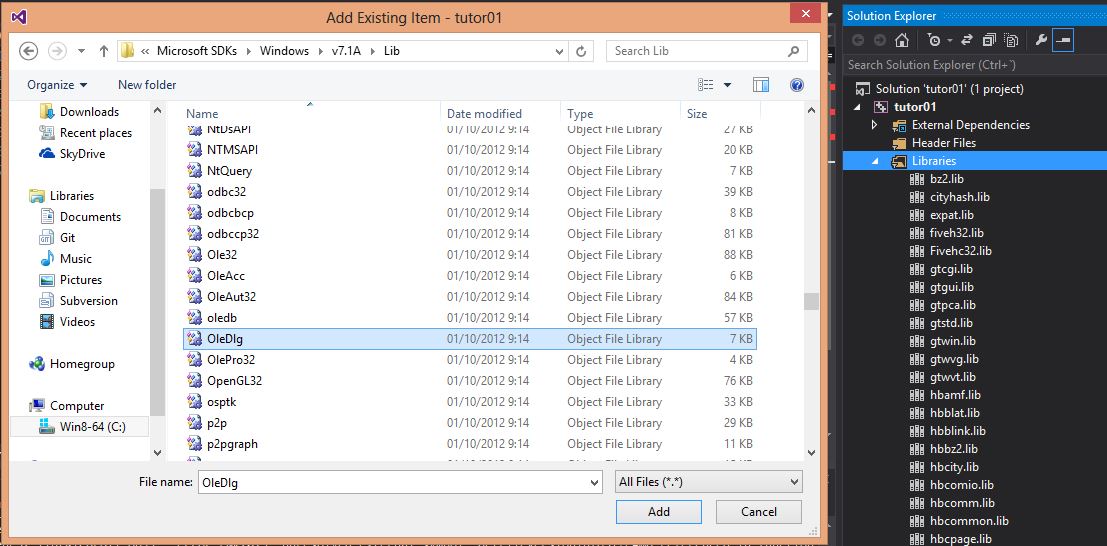
Now if you try to build your app ("Local Windows Debugger" the button with the "green play" bitmap), you will find that some Windows libraries are still missing, so we are going to add them too: OleDlg.lib, msimg32.lib, version.lib, ComCtl32.lib
look for them at c:\Program Files (x86)\Microsoft SDKs\Windows\v7.1A\Lib\

Add them as you did before adding FWH libraries:
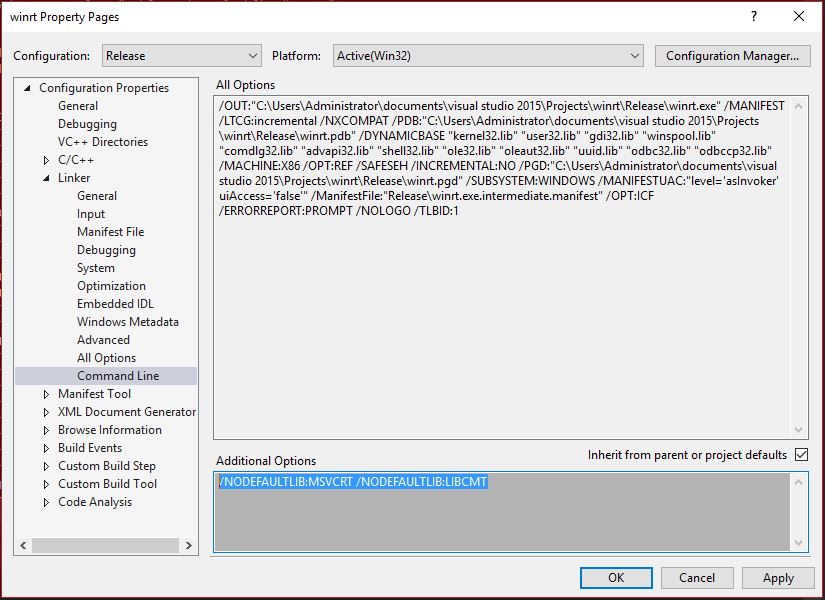
To remove the linker warnings add this options:
/NODEFAULTLIB:MSVCRT /NODEFAULTLIB:LIBCMT
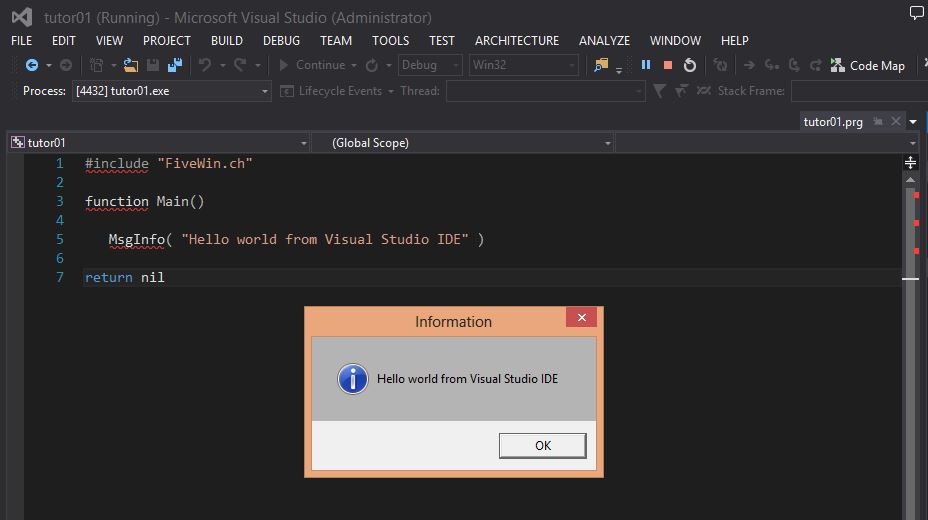
17. Now build your app and yes!!!, there it is!!!

2. Select empty:

3. Click on "Finish button"
4. You will get a project like this one:

5. Right click on "Source files" and select "Add an existing item" and start adding your PRG files:

6. Your PRGs will be shown in the "Solution Explorer":

7. Right click on the PRG file and select these options and click on "OK":

8. Right click again on the PRG file and these time fill these options this way and click "OK":
Copy the bold text from here:
c:\harbour\bin\harbour %(FullPath) /n /ic:\harbour\include /ic:\fwh\include
.\%(Filename).c
Warning: For Visual Studio Community 2015 use:
c:\harbour\bin\harbour "%(FullPath)" /n /ic:\harbour\include /ic:\fwh\include
If you are using an existing PRG located at a certain folder then use:
c:\harbour\bin\harbour "%(FullPath)" /o%(RelativeDir)%(Filename).c /n /ic:\harbour\include /ic:\fwh\include
%(RelativeDir)\%(Filename).c

9. At this point you can right click on the PRG file on the "Solution Explorer" and select "compile".

Alternatively you can already click at the top on Run ("Local Windows Debugger" the button with the "green play" bitmap) and it will get compiled.
10. Now you have to add the C file that Harbour generated to the project. Again Right click on "Source files" and select "Add an existing item" and
choose your filename.c, in this example tutor01.c

The "Solution Explorer" will look like this:

11. Right click on the C file and set this value and click on "OK":
Copy the bold text from here:
c:\harbour\include;%(AdditionalIncludeDirectories)

12. Again right click on the C file, select compile and it should properly compile it:

13. Now if you click at the top on Run ("Local Windows Debugger" the button with the "green play" bitmap), Visual Studio will try to build your app but the libraries have not been added yet, so you will get this:

14. Now we are going to add the libraries, but to keep our project well structured, right click on the tutor01 in the "Solution Explorer", just below "Solution 'tutor01' (1 project) and add "New filter" (it creates a folder) and rename it as "Libraries". It will look like this:

15. Right click on the Libraries folder and select "Add an existing item" and select FiveH32.lib, same for FiveHC32.lib:

16. Now lets add the Harbour for Visual Studio 2013 libraries. You can add one by one, or simply select all of them, but VERY IMPORTANT some of them have to be removed: All that end with ..._dll.lib in their names.
You have to remove: hbnortl.lib, hbnulrdd.lib, harbour-32.lib, hbvmmt.lib, hbmaindllp.lib, hbmainstd.lib, hbmaindllp.lib. Right click on their names and delete them (you will go faster if you delete all ..._dll.lib files before adding all the libraries):

Now if you try to build your app ("Local Windows Debugger" the button with the "green play" bitmap), you will find that some Windows libraries are still missing, so we are going to add them too: OleDlg.lib, msimg32.lib, version.lib, ComCtl32.lib
look for them at c:\Program Files (x86)\Microsoft SDKs\Windows\v7.1A\Lib\

Add them as you did before adding FWH libraries:

To remove the linker warnings add this options:
/NODEFAULTLIB:MSVCRT /NODEFAULTLIB:LIBCMT
17. Now build your app and yes!!!, there it is!!!
